
EcoVac Toilet – Ball, Shaft & Cartridge Kit 385310954
Original price was: $100.99.$78.00Current price is: $78.00.
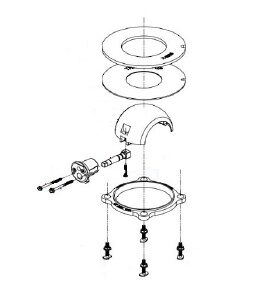
Avoid toilet malfunctions on the water by having the right replacement parts on hand. This kit is designed for EcoVac 100 Series gravity-discharge toilets and 5000 & 5100 Series VacuFlush toilets. For 5006 Series, use kit #385318162. Always refer to your toilet’s parts list or contact our customer service for support. For optimal performance, change the bowl seal kit (385311462) when replacing the Ball Shaft & Cartridge Kit. Installation instructions included.
7 in stock
Need it urgently?
When you are out on the water, the last thing you want to deal with is a toilet malfunction that leaves you needing to return to shore. Have the right replacement parts on hand with this kit designed for EcoVac 100 Series gravity-discharge toilet and 5000 & 5100 Series VacuFlush Toilets. Please note that 5006 Series toilets require kit 385318162. Be sure to refer to your toilet’s parts list for the item number required for your SeaLand toilet or contact one of our customer service reps for tech support.
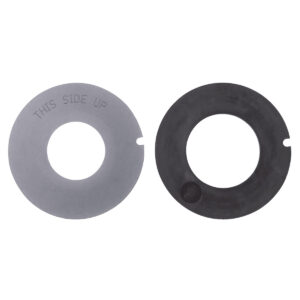
To keep your system working efficiently, we recommend you always change the bowl seal kit 385311462 whenever you change the Ball Shaft & Cartridge Kit. Installation instructions are included with this kit.
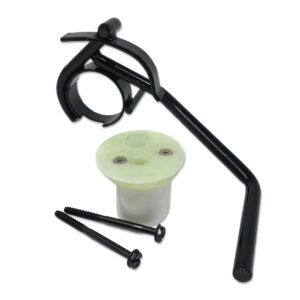
If the base of your toilet has a clamshell cover around it and the pedal is a metal rod with a plastic cover, use kit 385318162. If the head does not have a clamshell cover and the pedal is all plastic, this is the correct kit for you.
Part numbers:
Sealand numbers: 385310681 / 310681
Legacy number: 385310954 / 310954
Dometic SKU: 9108558452
Learn more about the ball / shaft & cartridge kits for pedal flush toilets
Watch this video to learn how to rebuild a VacuFlush head base
| Weight | 1 lbs |
|---|---|
| Dimensions | 4 × 3 × 3 in |
What Are the Benefits of VacuFlush for RVs vs Boats?
VacuFlush was originally developed for marine use, but its advantages translate extremely well to RV applications too. In both environments, it’s known for low water consumption, excellent odor control, and flexible installation options.
In both RVs and boats, VacuFlush uses very little water—about one pint per flush—which helps extend holding tank capacity and reduces how often you need to empty the system. The vacuum-powered design also removes waste quickly, helping minimize odors and improve overall sanitation. Because the holding tank does not need to sit directly below the toilet, installation is much more flexible than with traditional gravity systems.
In boats, VacuFlush is especially useful because it works well in tight spaces and complicated hull layouts where plumbing options are limited. It performs reliably while underway, even in rough conditions, and is often considered a premium upgrade that can add resale value.
In RVs, the system makes possible layouts that gravity toilets often cannot support, including slide-outs, rear bathrooms, and basement-mounted holding tanks. It also helps conserve freshwater, making it popular with boondockers and full-time RVers who want a cleaner, more residential-style bathroom experience.
What Level of Difficulty is Involved in a DIY VacuFlush Installation?
Installing a VacuFlush system yourself is absolutely possible, but it’s best suited for SUPERTECH-trained technicians. Replacing a toilet is generally much easier than installing an entire new system.
A basic toilet replacement—such as swapping out an older bowl or base—is usually a straightforward job and can often be completed in a few hours. Most of the work involves disconnecting and reconnecting hoses, replacing seals, and mounting the new unit properly.
A full system installation is more involved. It may include installing a toilet, vacuum generator, holding tank, and sanitation hoses, plus wiring the system to the proper power source. Correct hose routing, airtight vacuum seals, and proper electrical connections are critical. Mistakes in these areas are the most common causes of issues like vacuum leaks or a pump that runs continuously.
The good news is that careful planning, the right tools, and patience go a long way. Many owners successfully complete DIY installations, especially when upgrading an existing system. AquaStar also offers video tutorials to help guide the process.
How to Upgrade from an Old SeaLand to New Dometic VacuFlush
The good news is that older SeaLand VacuFlush systems are generally very compatible with newer Dometic models. Since Dometic acquired SeaLand, most replacement and upgrade parts were designed with backward compatibility in mind.
Start by identifying your current toilet and vacuum generator model. In many cases, your existing 1.5-inch sanitation hoses and plumbing layout can remain in place, which makes upgrades much easier.
From there, you can choose how extensive you want the upgrade to be. Some owners replace only the toilet bowl for a newer style and improved comfort. Others upgrade the vacuum pump or motor for quieter operation and better reliability. If the existing system has recurring issues, a full vacuum generator replacement may make the most sense.
Installation typically involves shutting off water and power, pumping out the holding tank, removing the old components, installing the new parts, reconnecting hoses and wiring, and testing the system thoroughly for leaks and proper vacuum performance.
For most owners, upgrading to newer Dometic components improves reliability, reduces noise, and makes future maintenance easier thanks to better parts availability.
This video shows some instructions on upgrading toilets:
How to Wire a VacuFlush System?
Wiring a VacuFlush system is not especially complicated, but it does need to be done correctly for safety and reliable performance.
Most VacuFlush systems operate on 12-volt or 24-volt DC power and use relatively little electricity. Even so, the system should always be installed on a dedicated circuit with the correct fuse or breaker.
Marine-grade or RV-grade wiring materials are strongly recommended, including stranded tinned copper wire, proper crimp connectors, and heat-shrink protection to prevent corrosion. Good grounding is also essential.
The typical wiring process involves routing power from the battery or DC panel to the vacuum generator, toilet controls, and any optional accessories such as tank level sensors or status panels. Once everything is connected according to the manufacturer’s wiring diagram, the system should be tested to confirm the pump cycles properly and vacuum builds as expected.
Low voltage is one of the most common causes of poor VacuFlush performance, so correct wire sizing and solid electrical connections are important. If you are not comfortable working with DC electrical systems, professional installation is recommended.
When Is It Time to Replace a VacuFlush Vacuum Generator?
Most VacuFlush vacuum generators are not replaced on a schedule—they are replaced when rebuilding no longer solves the problem.
In many cases, the first and most cost-effective repair is a rebuild. Replacing common wear parts such as duckbill valves, bellows, gaskets, and seals can restore performance and extend the life of the system for years.
Replacement usually becomes necessary when the pump runs continuously, struggles to build vacuum, fails repeatedly after rebuilds, or shows signs of major wear such as leaks, overheating, unusual noises, or electrical failure.
A well-maintained vacuum generator can often last 10 years or more, and many systems remain in service for well beyond that with regular maintenance.
As a general rule, start with a rebuild kit. If performance still does not improve, it may be time to upgrade to a complete new vacuum generator.
If you determine that rebuilding is suitable, here is our major rebuild kit:
Related products
-
Sale!
Metal Lever Toilet Rebuild Kit 4471014046
Original price was: $181.99.$160.00Current price is: $160.00. -
Sale!
Replacement Lever Arm for Vacuflush and Traveler Toilets
Price range: $100.00 through $115.00Select options This product has multiple variants. The options may be chosen on the product page -
Sale!
Plastic Pedal Toilet Rebuild Kit 4471014045
Original price was: $162.99.$140.00Current price is: $140.00. -
Sale!
Teflon and Rubber Bowl Seal Kit W/O Overflow Holes 385311462
Original price was: $73.99.$48.00Current price is: $48.00.